Add watermark to images with Canvas
Until a few months ago, I used Javascript Canvas in some Three.js related topics, but didn’t really dig into how they work. Seeing those ctx.aFunction() in those tutorials scared me.
I have had to realize a personal project for someone close to me, that needed to make some image processing. The problem was that I was not comfortable with Python or any other langage similar, usually used to perform this type of tasks. I choosed Canvas to achieve my goal : place a text or an image file all over an uploaded image.
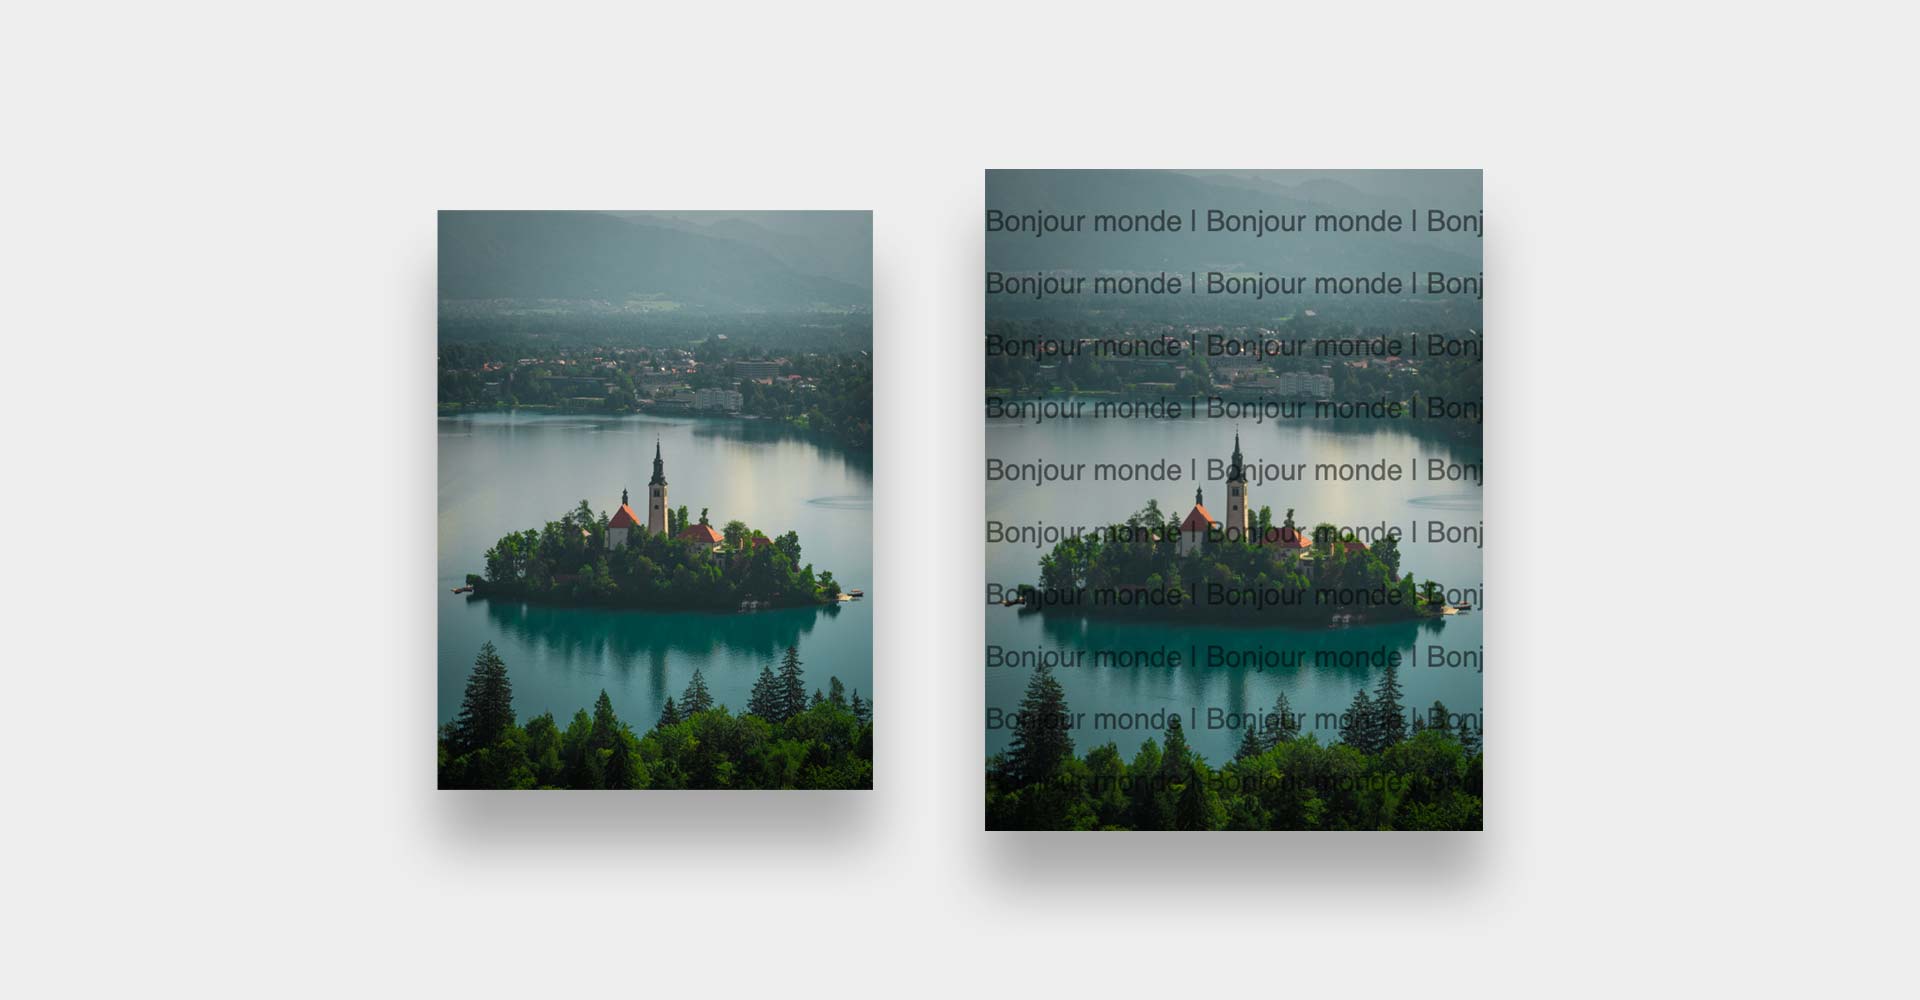
I will take one of my personal photos as an exemple to show the results along the post.
What are we going to achieve ?
During this article, we will consider you have an <img> element containing your image. It could be visible or directly created with Javascript, It doesn’t matter.
Create the canvas
We will begin by creating our canvas, get his context and set the size of the result image size :
const canvas = document.createElement("canvas");
const context = canvas.getContext("2d");
const SHORTSIDE = 720;
Next, we need to determinate if the image is horizontal or vertical. To do so, we will write this simple line line of code. If the width is superior to the height, it will return ‘horizontal’, else it will return ‘vertical’.
const orientation = file.width > file.height ? 'horizontal' : 'vertical'In order to keep the good image size, we calculate the image ratio of the longer side from the shorter one. Actually, the ternary condition calculate the ratio (W / H or H / W) the multiply by the 720 (the shorter size) :
const longSide = orientation === 'horizontal' ? (file.width / file.height) * SHORTSIDE : (file.height / file.width) * SHORTSIDEThen we apply those dimensions to our previously created canvas :
const canvasWidth = orientation === 'horizontal' ? longSide : SHORTSIDE;
const canvasHeight = orientation === 'horizontal' ? SHORTSIDE : longSide;

canvas.width = canvasWidth;
canvas.height = canvasHeight;

context.drawImage(file, 0, 0, canvasWidth, canvasHeight);
Our actual code looks like this :
const canvas = document.createElement("canvas");
const context = canvas.getContext("2d");
const SHORTSIDE = 720;

const orientation = file.width > file.height ? 'horizontal' : 'vertical'
const longSide = orientation === 'horizontal' ? (file.width / file.height) * SHORTSIDE : (file.height / file.width) * SHORTSIDE
const canvasWidth = orientation === 'horizontal' ? longSide : SHORTSIDE;
const canvasHeight = orientation === 'horizontal' ? SHORTSIDE : longSide;

canvas.width = canvasWidth;
canvas.height = canvasHeight;

context.drawImage(file, 0, 0, canvasWidth, canvasHeight);
Adding text to the image
At this point, we have a canvas at the exact same dimensions as our image. If we decide to export or display the canvas, it will perfectly render the source image. Let’s add some text onto it.
One thing to know about canvas, is that they do not support any responsive value. You can forgot using REM, EM or anything similar, reconnect with good old PXs. That’s why we’ve used a fix size when creating our canvas.
We need to start somewhere, so let’s divide our canvas in rows. We will consider those rows are 75px high with a 35px sized font :
const LINEHEIGHT = 75
const lines = canvas.height / LINEHEIGHT
Create a string with the text you want to write, and make it repeat the amount you want. I recommand 5 times for the size we use from the beginning :
const str = `Bonjour monde | `.repeat(5);Canvas are sequences of instructions that you have to read as a recipe : one by one. You write settings for the following lines, then set others settings for next lines… Here, we will set the font settings & the transparency level of the next actions :
context.font = '35px sans-serif';
context.globalAlpha = 0.5;
Now everything we do will use this font and be 50% transparent.
All we have to do now is to write our lines of text. A simple for loop that repeat the number of lines we calculated before and that create a text at position (0, 0), (0, 75), (0, 150)… so that it fills the image.
for(let i = 1; i < lines; i++) {
  const y = i * LINEHEIGHT;
  context.fillText(str, 0, y);
}
Adding a logo to the image
A text is cool but you could prefer your logo instead. The process is quite the same.
First of all, we will set the spacing between our logo instances, and create a HTML <img> containing our logo.
const MARGIN = 10
const logo = document.createElement('img')
logo.src = '/logo.svg'
We have to wait for the image to be loaded, so we’ll use a Promise for that :
await new Promise(resolve => {
  logo.addEventListener('load', async () => {
    // ...
    // Our code
    // ...
    resolve()
  })
})
To create the logo instance, we have quite the same steps as for texts. We set the globalAlpha (transparency), we calculate the rows/columns amount of logo and finally we draw the good amount. For each rows, we draw X columns :
context.globalAlpha = 0.5;
const ratio = logo.width / logo.height
const logoWidth = 120
const logoHeight = logoWidth / ratio
const columns = Math.round((canvas.width / logoWidth) + 3)
const rows = Math.round((canvas.height / logoHeight) + 3)
for(let c = 0; c < rows; c++) {
  for(let r = 0; r < columns; r++) {
    context.drawImage(logo, r * (logoWidth + MARGIN), c * (logoHeight + MARGIN), logoWidth, logoHeight);
  }
}